Install and configure puppet server on Ubuntu

Before we install and configure puppet server (puppetmaster), ensure that your network is properly setup with static ip addresses and that servers can communicate with each other.
Configure Puppet Server on Ubuntu 10.10 is easy and straight forward. It’s those subtleties about the network configuration and necessary puppet recipes and files that can make our lives miserable.
To install and configure Puppet, choose one of the following methods
In this walk thru, we’re using the package manager of Ubuntu. You can simply use the one of your linux distro or install it from source (below).
- RPM (Fedora) for Red Hat, Fedora (puppet-server for server, puppet for client)
- DEB (Debian) for Ubuntu, Debian (puppetmaster for server, puppet for client)
Installing from source: (note: you will need to have Ruby installed on your system prior to installing Puppet)
download the latest version from puppetlabs. The strategy between community and enterprise versions frequently changes, you will have to find your way to the community downloads. Once downloaded, proceed to the following steps.
 # cd puppet-0.xx.x
 # ruby install.rb
 # puppet --version (to verify installation)
Using Ruby Gem: (note: you will need to have Ruby and Ruby Gem installed on your system prior to installing Puppet)
# gem install --remote --source http://reductivelabs.com/downloads puppet
Create a puppet user and group, in case your installation method did not automatically create them for you:
# groupadd puppet
# useradd –M –g puppet puppet
Create a manifest. Without manifest (a text document that defines a particular configuration), puppetmaster will trow an error:
# mkdir –p /etc/puppet/manifests
# mkdir –p /etc/puppet/files
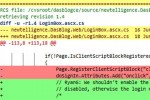
# vi /etc/puppet/manifests/site.pp (and add the following puppet class)
package {
'htop' :
ensure => installed
}
Start the server (we start it manually to ensure it works without errors, later we will start it as a daemon)
# puppetmasterd --verbose --no-daemonize
You should get confirmation that the puppet server has started and displaying the current version. Any error messages should get resolved at this point before moving on to Install and configure puppet client on Ubuntu.