ssl_error_rx_record_too_long

Getting the error as End User
If you’ve come across Firefox error code ssl_error_rx_record_too_long as a user, your options are limited because most problems resulting in this error are web server related.
The best course of action is to clear your browser’s cache and try again. Possibly try to use another browser and see if that solves it. The likely reason for it is that you may have visited that same site in the past before it had SSL enabled, and ...
Is Agile Overhyped or Misused?
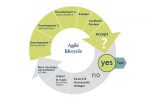
Over the past few years, agile has overtaken the development scene from being a buzzword to being implemented everywhere, or so it seems. Is anyone claiming not to be agile these days?
I believe the benefits of Agile development still stand. Enhanced visibility and adaptability, reduced risks and increased business value, if implemented properly. But the way it’s used in most teams today, it hardly meets any of these criteria.
In the mid 90’s I was implementing Six Sigma which is based ...
Building a Team

This article is not about the usual subjects, like motivation, communication etc. What I’m talking about is consciously planning to build, improve and measure key metrics of a development team. Often times, teams get built over time with little awareness of their dynamic. “We’re swamped, we need a javascript developer”, or “For this project, we got to add another dba” and so it goes. Before we know it, the team has grown and if we don’t define the values of our ...
Custom URL Parameter Rewrites in WordPress

Recently, I was building a custom search page in WordPress for a gift idea site, where users could select the occasion (Birthday, Christmas …), the recipient (Women, Girl …) and the maximum price of the gift. In addition, I wanted the URL to be nice and SEO friendly, without query parameters.
Now, creating nice URLs within the confines of what WordPress has to offer out of the box is really simple by means of taxonomy and URL rewrites. But implementing a ...
Visual Tweaks for Sublime Text

Sublime is a great text editor, especially for programmers who look for formatting, keyboard shortcuts and customization. It is my text editor of choice for a while now.
There are tons of custom settings, just have a look at Preferences -> Settings Default. We often don’t take the time to setup our tools, but doing so with Sublime is definitely worth it. I’m writing up my most essential settings to make working visually with Sublime even better, have a look and ...
Definitive C++ Book List

There is never enough feedback for good programming books, especially for C++ which is still the king of programming languages. Most importantly, which book is ideal for for what level? Beginners need an ease into the language, while hard core experts need a deep dive into the inner workings on certain functions and behaviors.
Below is a compiled list of good C++ books with enough feedback from readers, sorted by level of expertise.
Best Beginner C++ Books Programming: Principles and Practice Using C++ ...Best MySQL GUI clients

The best MySQL GUI client is the one that does all or most of the tasks much easier and faster than by any other method. But the selection of tasks varies from person to person, whether one is an administrator, a developer or both.
In this article we’re going to look at the optimal mix for both types of usage and highlight ones that are more suitable for MySQL administration and database development.
The best MySQL GUI clients in ranking order NavicatThe best ...
Top 5 Overlooked SEO Mistakes

There are a lot of talk about SEO since Panda and Penguin, and lots of web masters are trying to cope with the changes that impacted their site traffic. Some of the common pundits are little content vs. html markup code, automated content generation by web scraping, keyword stuffing, buying external links to increase page rank among many more.
Since Google has been fairly vague about the implications in Panda and Penguin, speculations about what impacts Google Search ranking are rampant and ...
How to Install Java JDK 7 in Ubuntu

Chances are you installed Open JDK, which ships as default in the package manager and you’re having compatibility issues with some of the apps requiring Java native Java Development Kit. Not only can mismatch of different vendors cause havoc, but also version issues especially between JDK 6 and JDK 7.
Installation of Oracle Java JDK 7 can turn into a major headache, but it doesn’t have to. Here are the steps for a straight forward Java JDK 7 installation in Ubuntu ...
Linux Screen Command – Window Management At It’s Best

Just in case you haven’t heard about Screen or don’t know what the Linux Screen Command is about, in short – Screen is the de-facto window manager in a Linux/Unix environment.
Not only does Screen let you open and switch between multiple windows, Screen also let’s you run programs in it’s won environment, even if you close the current SSH session. This comes in handy when you have scripts that run for a long time and could potentially timeout in SSH.
Another ...