Visual Tweaks for Sublime Text

Sublime is a great text editor, especially for programmers who look for formatting, keyboard shortcuts and customization. It is my text editor of choice for a while now.
There are tons of custom settings, just have a look at Preferences -> Settings Default. We often don’t take the time to setup our tools, but doing so with Sublime is definitely worth it. I’m writing up my most essential settings to make working visually with Sublime even better, have a look and ...
Definitive C++ Book List

There is never enough feedback for good programming books, especially for C++ which is still the king of programming languages. Most importantly, which book is ideal for for what level? Beginners need an ease into the language, while hard core experts need a deep dive into the inner workings on certain functions and behaviors.
Below is a compiled list of good C++ books with enough feedback from readers, sorted by level of expertise.
Best Beginner C++ Books Programming: Principles and Practice Using C++ ...Linux Screen Command – Window Management At It’s Best
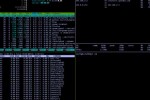
Just in case you haven’t heard about Screen or don’t know what the Linux Screen Command is about, in short – Screen is the de-facto window manager in a Linux/Unix environment.
Not only does Screen let you open and switch between multiple windows, Screen also let’s you run programs in it’s won environment, even if you close the current SSH session. This comes in handy when you have scripts that run for a long time and could potentially timeout in SSH.
Another ...
Useful Linux Terminal Commands

This is a compilation of most of my past searches for linux terminal commands, starting years back and I kept track of them here for easy retrieval. Since some of them are rather rare, useful Linux Terminal Commands, also often asked for by users, I decided to just publish them here.
The list may grow longer over time and if you got some nice ones that is of general interest, please let me know and I’m happy to add them.
How to ...Install Oracle Java JRE on Ubuntu 12.04

Dealing with different versions of Java Virtual Machine or Java Runtime Environment (JRE/JVM) has always been a bit of a pain, especially on Linux, where we have not only different versions, but also different vendors. To make matters worse, some application require the original Sun/Oracle version, while others are perfectly fine with open source version.
In the past, Sun provided an installer for deb and rpm based distributions, but since Ubuntu 12.04, there is no luck. However, installing Oracle’s JVM manually is actually straight ...
Install ffmpeg on Mac Snow Leopard

Ffmpeg is the de-facto open source standard for encoding audio and video. Especially with the arrival of html5 which uses codecs like Ogg, Theora, Vorbis, h264, webm among others, and the increasing popularity of devices from Apple, such as iPod, iPad and the iPhone, all of which require a different standard from flv, the version so widely in use by Adobe Flash.
Another positive aspect is that ffmpeg has a much revived developer group, posed to enhance the application on a ...
Access Dropbox From Linux Server Command Line

Access Dropbox from the command line on a Linux server is a real time saver, especially for developers. Sharing files between Virtual Machines (VM) can be a pain, especially if your VM is running on a text based server without UI. For example, I start up a new VM for almost anything and I deal with up to 20 different sites and application and every one has it’s own VM.
VMWare provides it’s “Guest Additions” and that includes folder sharing. It ...
Fix for OSX 10.6.5 apachectl: ulimit open files
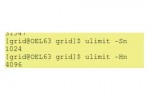
If you’ve recently upgraded your Mac to OSX 10.6.5, and are a developer who run apache locally on your machine, you’re likely to find yourself with a broken web server.
Installing and running a Lamp stack on a Mac has never been as easy as, let’s say Ubuntu or even Windows, and we certainly appreciate the fact that Apple is including more and more of it in its standard OSX base install, but unfortunately a bug that kills Apache web server ...
Setup Puppet to configure your network servers

Growing companies at some point are faced with the increased workload to setup, configure and maintain their servers and applications. Administrators try to script repetitive tasks and ultimately look for solutions that are scalable and provide a central management tool base. There are several software packages available, commercial and open source ones.
Puppet is probably the most used open source configuration management package available today and more system administrators and software developers are interested in setting it up within their environment. ...
Install and configure puppet server on Ubuntu

Before we install and configure puppet server (puppetmaster), ensure that your network is properly setup with static ip addresses and that servers can communicate with each other.
Configure Puppet Server on Ubuntu 10.10 is easy and straight forward. It’s those subtleties about the network configuration and necessary puppet recipes and files that can make our lives miserable.
To install and configure Puppet, choose one of the following methodsIn this walk thru, we’re using the package manager of Ubuntu. You can simply use the one ...